
Salam Ramadhan Kareem. I’ve just finished design and install my own shelving unit in the study room. So, let me share what I’ve been through. I hope this entry can help you in do-it-yourself furniture. Yes, I still love doing furniture design. Its time to apply what I’ve learn in university in my real life.
Table of Contents / Kandungan
1. Analyze the problem
My parents love to keep antique and old items in the house. The problem is where to keep them properly without consuming spaces in the small room. Previously, everything is put on the floor. Next, buying a ready made shelf is expensive and it does not fit beautifully in the room.
2. Figure out the best solution and case study
I guess the solution is to put everything on a shelf which is vertical and space saving. I’m a big fan of IKEA and I always look for case study of their products, but these storage and shelving unit is quite pricey, e.g. Anga (RM950), Laxvik (RM365) and Ivar (RM585). This is the reason why I should design my own shelf.
3. Site analysis
This is crucial because in designing custom made furniture, it should suit the space, which is the study room. In this case, I have to measure the space using measuring tape. I also have to consider two wooden boxes which is located on the floor.
4. Price quotation
I’ve wanted to design a low cost heavy duty storage shelf. I’m considering to use steel frame and wooden planks. So I went to a hardware shop to get the price of these item. 10 feet steel frame – RM20. 1 unit of bolt and nat – 20 cent. Bracket – RM1. 8′ x 4′ 4mm wooden plank – RM20.
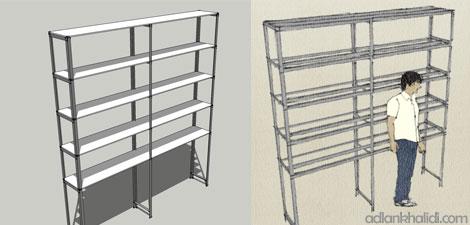
5. Start designing
Now, I have the price of these steel frame and wooden planks. Its time to create the design and it should not exceed my budget. I always start with a manual sketch using pencil and paper. After that I produce the 3D rendering using computer. For this project, I only use Google SketchUp to get the correct measurement and visualization. These renderings show different installation method which may affect the price.
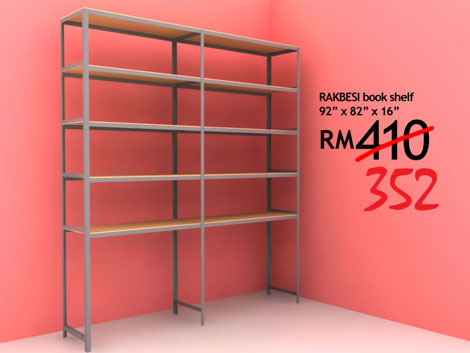
6. Shopping
After I’ve finalized the design, its time to go for shopping. I have to ask the shopkeeper to cut them in the correct measurement before carrying them back home in my car. Here’s the teaser poster, including the price and surprisingly, it only cost me RM352. I call it Rakbesi and imitated IKEA poster design style.
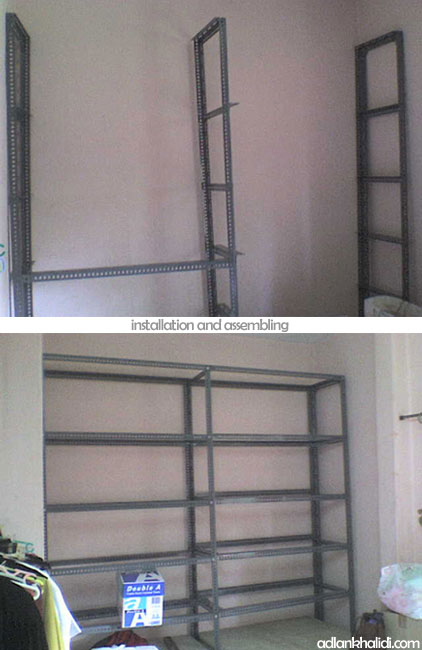
7. Installation and assembling
One of the advantage of using this type of steel frame is the adjustable feature. I can change the height for each level easily. I’m using bolt and nat to fix the jointing of the steel frames.
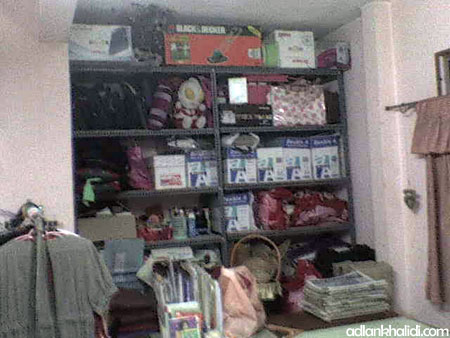
8. Rearrange all items
Finally, its time to rearrange all the items on the shelf. I know it doesn’t look really nice. But this is the efficient way by placing them vertically, I had save lot of space on the floor!
I guess that’s all for today. Its quite a tough when installing those frame while fasting.
wow… pandainya.. hermmm nak gak buat cam ni.. tapi ilmu kurang… takut lain plak jadinya nanti… ehehehe…
kalau kurang ilmu, boleh belajar. tanya la pada yang reti buat. senang je. nak senang, upah la tukang kayu ke.. ada duit semua jalan!
wow… pandainya.. hermmm nak gak buat cam ni.. tapi ilmu kurang… takut lain plak jadinya nanti… ehehehe…
kalau kurang ilmu, boleh belajar. tanya la pada yang reti buat. senang je. nak senang, upah la tukang kayu ke.. ada duit semua jalan!
design yang praktikal, best! =D
Besi tu dia jual ikut semeter berapa?
aisey. biasa2 je design. hari tu beli ikut kaki la. 10 kaki RM20. 10 kaki lebih kurang 3.04 meter.
biar lebih, jangan kurang!
design yang praktikal, best! =D
Besi tu dia jual ikut semeter berapa?
aisey. biasa2 je design. hari tu beli ikut kaki la. 10 kaki RM20. 10 kaki lebih kurang 3.04 meter.
biar lebih, jangan kurang!
eh abg add
tingin nk try design utk rumah gk
shopkeeper tu org yg supply kan abg add brg2 besi tu ke??
xtau nak tnye kdai mane utk tu x(
yep. shopkeeper tu orang jaga kedai hardware tu la.
dekat area business centre kan banyak kedai hardware.
abang slalu pegi yang pengedar cat Nippon tu. sebelah kedai akuarium. banyak barang kat situ!
nice one.i think this is super minimalist shelve unit
I don’t think its minimalist enough. its is a low budget style. hehe
nice one.i think this is super minimalist shelve unit
I don’t think its minimalist enough. its is a low budget style. hehe